Tips and Tricks for Oculus Quest Development with Unreal Engine 4(.25.3 — .26.2) Part 3 With Pictures!
Since the last article, which has seen quite a few hits (thank you all for checking it out, hopefully it helped), I have embarked on the journey of uploading to the Oculus App Lab so as to publicly be able to share and test my game, FromLight (more on that in a different article, because I don’t need to plug my own projects in a learning article… too much).
This article will primary cover the settings I have gotten to work (currently on Quest 1, while waiting for the Oculus Launchpad program to send me the Quest 2 Developer kit). These settings include some input from the outstanding Developer Advocates at Oculus, as well as a considerable amount of trial and error.
As of 4 September 2021, these settings are testing as making a greater than 2gb project package, upload, download, and play on Oculus Quest successfully.
Without further ado, let’s go through the settings in Unreal Engine, starting with Project Settings.
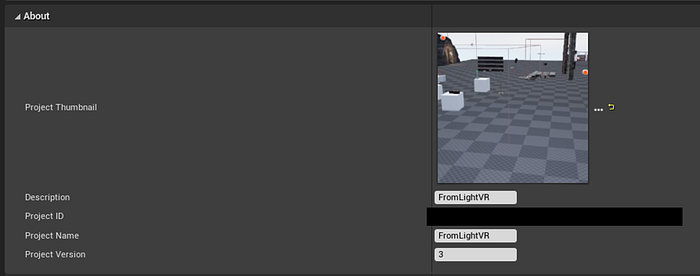
With the project settings, you will need to generate the project ID (simple enough) but also increment the Project Version with every update. I didn’t think this was necessary, but then got a mismatch error when the project version did not match the store version. Moving on, we have our Render Settings:
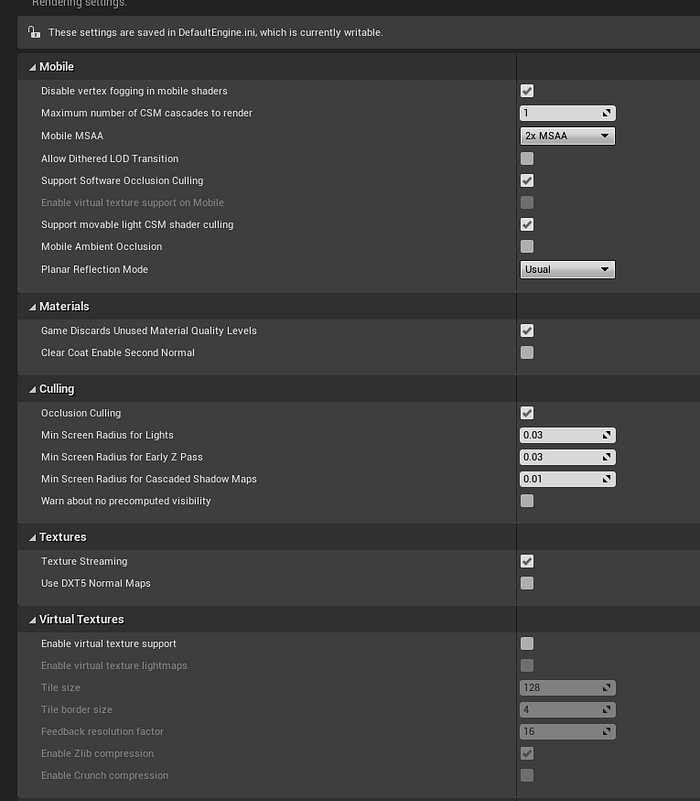
Most of these settings are aggressively set to maximize performance while still allowing some higher end effects, like the player holding a torch and lighting their environment. The MSAA can range from none to 4x, with 4x being the most expensive you would want to go.
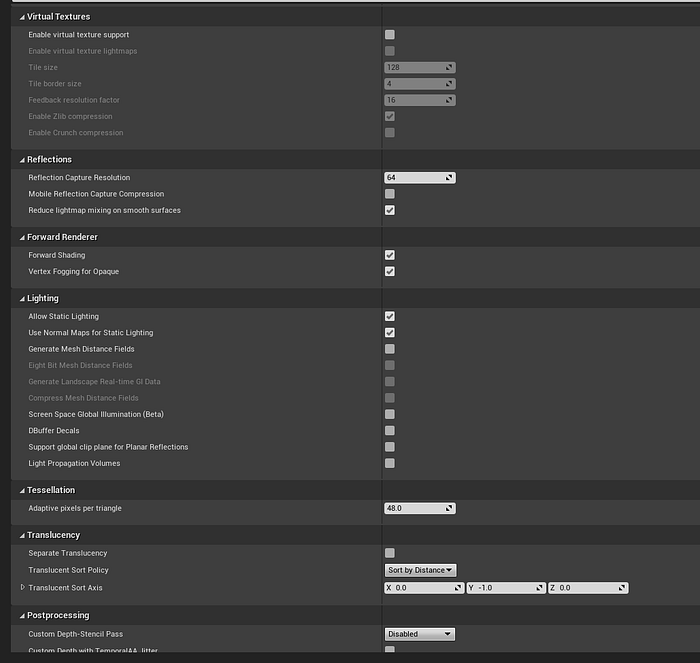
Some big points here. First off, Forward Rendering should be on. Let me foot stomp that, Forward Rendering should be on. This takes advantage of the particular way the mobile chipsets work on Oculus Quest (for more information on forward rendering versus deferred rendering, see the following excellent article below):
https://gamedevelopment.tutsplus.com/articles/forward-rendering-vs-deferred-rendering--gamedev-12342
Static lighting is some of the cheapest lighting you can have for your project (unless you are going completely unlit). So that is smart to include as well.
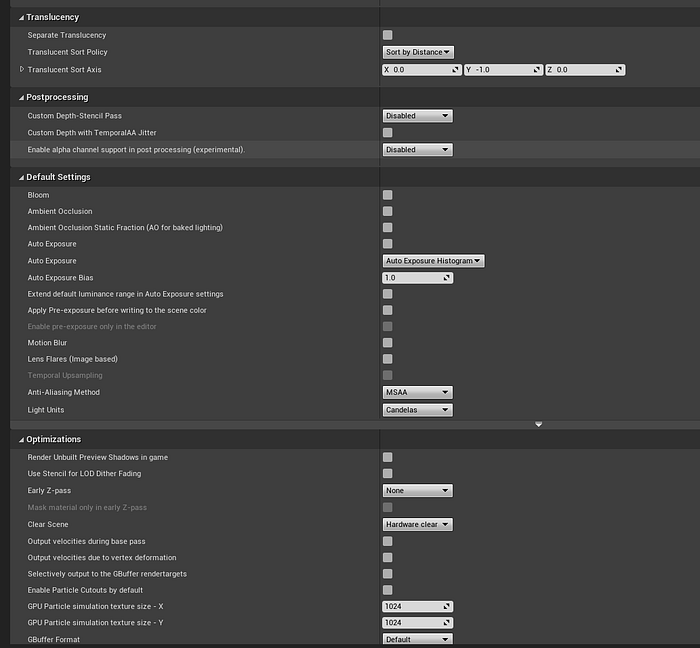
For this screen, the key is to turn off default post processing. If you are on the latest Oculus Developer build of UE 4.26.2 (which I suggest to the point of saying it is mandatory), you will have access to post processing through the Vulkan Renderer, but you don’t need to add it here, instead at it with post processing volumes (article about the Vulkan enablement of non-Mobile HDR Post Processing can be found below):
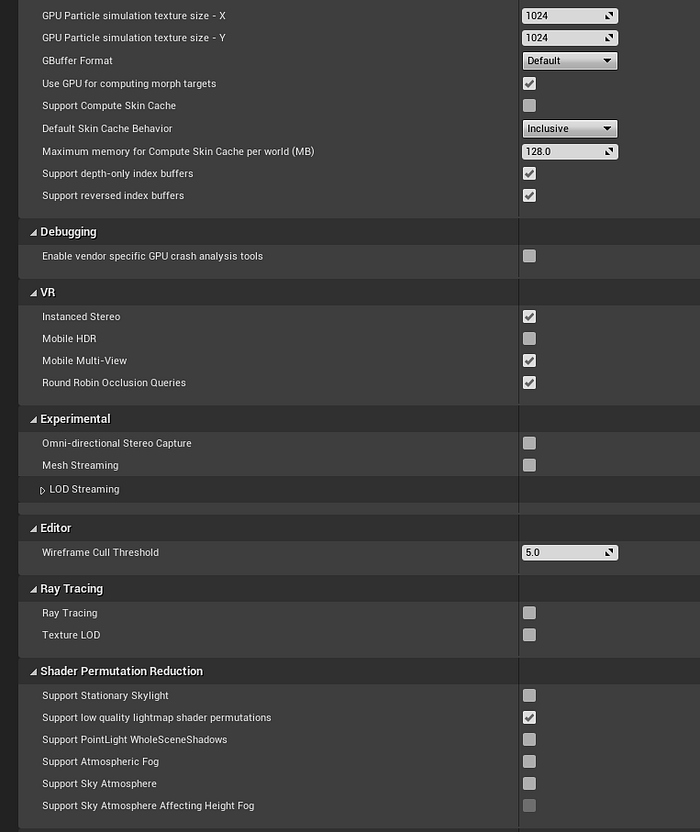
Okay, last bit of render settings. Here, some of the key settings are instanced stereo, mobile multi-view, and round robin occlusion queries being enabled. Profiled out, this seems to give the best bang for your buck. Mobile HDR should be turned off, as this will demolish your performance.
Now we move on to Android Settings. These include settings to allow your package to build and ensure your project is sorted for Android development. This is also assuming you have gone through the Android project setup pages at both Epic Games and Oculus (link to Oculus because they handily link back to Epic Games):
So on to the settings:
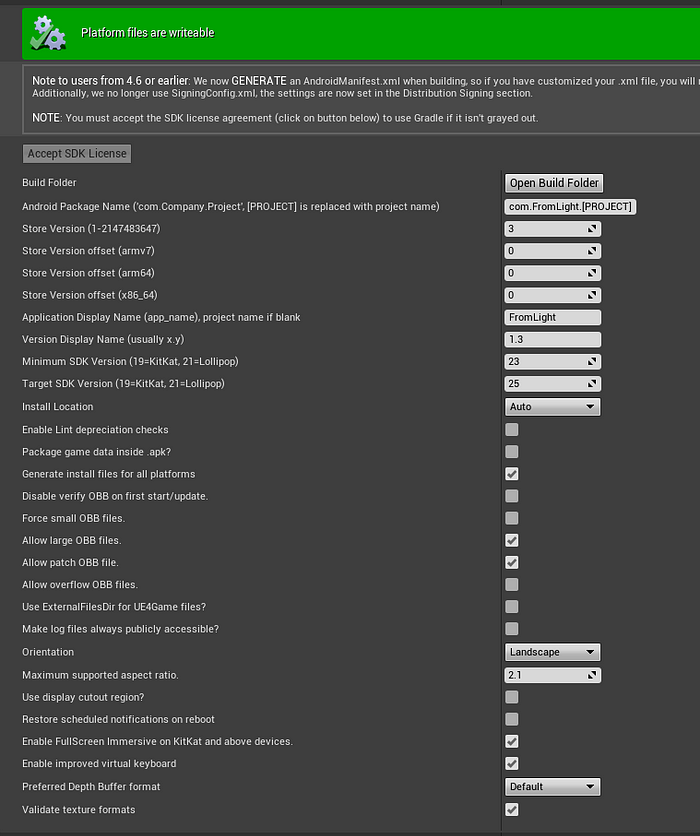
First off, notice the green banner that says Platform settings are writeable. This is important and means your Gradle and JDK settings are working. Another point here (especially in regards to the Oculus App Lab) is that you will need to increment that Store Version every time you submit a new build, otherwise the submission process will kick it back). For the rest of them, make sure the settings match.
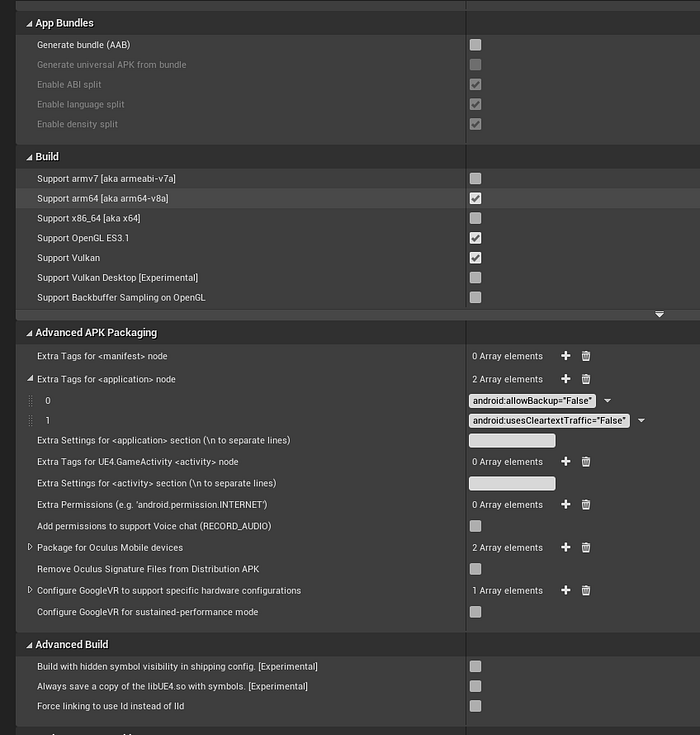
Here I would like to point out two things, first the configuration of the arm64, OpenGL ES3.1, and Vulkan. All of those work well. Second, the extra tags for application nodes and the codes that are in there. There is another set that I need to edit on the manifest (will be added there, with an update later on).
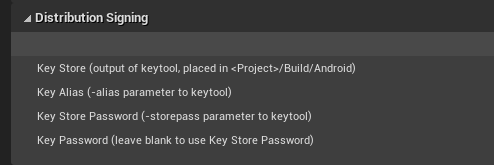
I’ve snipped off half of this page due to the need to protect some of the App-specific keys that secure my IP. That said, the below article explains how to signed your key for distribution, which is required for submission to the App Lab, even for development builds.
Lastly we get into packaging settings. These are important, but like all of the other ones above, this is the sole configuration that I’ve found to work.
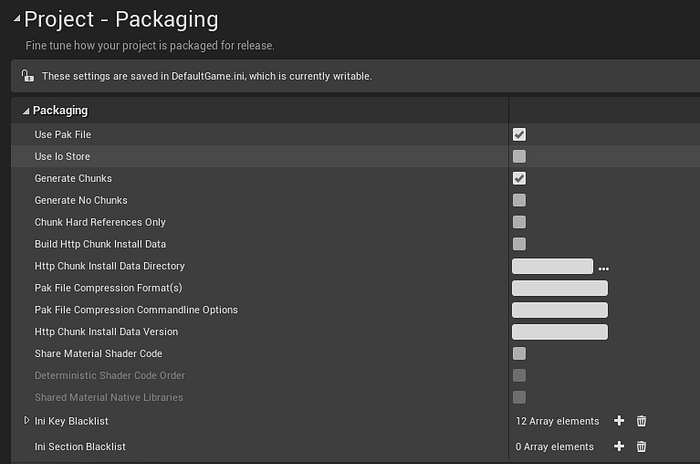
This one is simple, but Chunky Paks are important. Moving on…
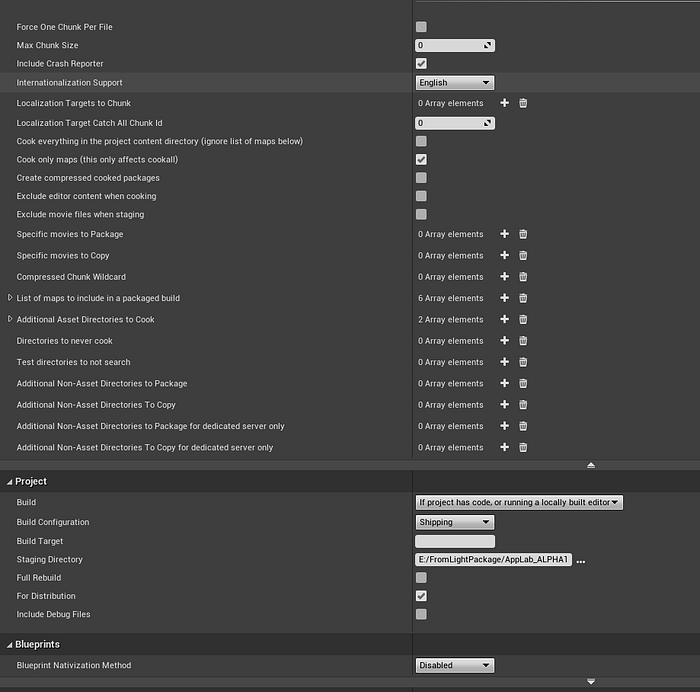
This one has some key points I would like to address. First, Cook Only Maps helps keep the package size down, I.e. if an object isn’t in a map, it doesn’t get cooked. Second, and you can’t see this (don’t worry, I’m kicking myself) but where it says List of Maps to include in a packaged build, you will need to provide the path to those maps.
Also you will see the Build Configuration as “Shipping” and the project marked as For Distribution. This is required for the Oculus App Lab, even for development builds. Full Rebuild isn’t necessary *every* time, but when you are submitting your final release candidate, you should definitely check this box.
For the time being, I have Blueprint Nativization marked as “Disabled”. This is mostly because some plugins I am using disagree with it, and I can’t be bothered to dig into the “why” at this time. I can say with absolute certainty that I will be enabling this setting and going through the ensuring pain prior to release, if only to get the performance boost from having it enabled.
Now we move over to the command line interface submission. This appears to be the preferred method of uploading files to the App Lab. Some articles indicate the the Oculus Developer Hub application is suitable for builds under 1gb in size. Another method, the Oculus Platform Tools Plugin in Unreal Engine works similarly, but appears to have difficulties getting the right options set for the expansion files. The command line interface (CLI for short) may be intimidating for users who are used to working with more graphic representations, but I can assure you, it works quickly and ably to submit projects.
First, I have a .txt file that has my command line interface string, and we will work through that.

Because I support you, I have included the String in its base form below to copy and paste. Just remember that you need to input the App ID, API Token, and the path to your project directory:
ovr-platform-util upload-quest-build — app_id “Insert APP ID Here” -s “Insert API Token Here” — apk E:\FromLightPackage\AppLab_ALPHA1\Android_ASTC\Fromlight-Android-Shipping-arm64.apk — obb E:\FromLightPackage\AppLab_ALPHA1\Android_ASTC\main.com.FromLight.FromLight.obb -c ALPHA
This is a two part string. The first command is the base setting for my specific project, which has an .apk as well as an expansion .obb file. The instructions that are censored and labeled 1 and 2 correspond with the 1 and 2 sections on the App Lab API page below. To submit, you must have created a developer account with Oculus, and you must have created an app with a unique Application ID and API Token.
For this part, you will navigate to where your Oculus Platform Tools were installed in your command prompt, and past the above line. The second line above that starts with assets_dir will actually go after the last .obb (and prior to the -c ALPHA) in the first line only if you have further expansion content to include (like a DLC). The ALPHA refers to the release channel that you will send this build to.
To find where you app ID and API token is on the Oculus Developer Dashboard, you will go to the Dashboard, and then into your profile.
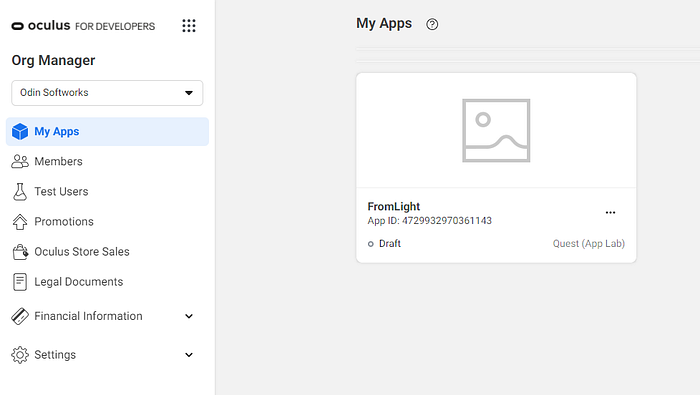
Click on your app…
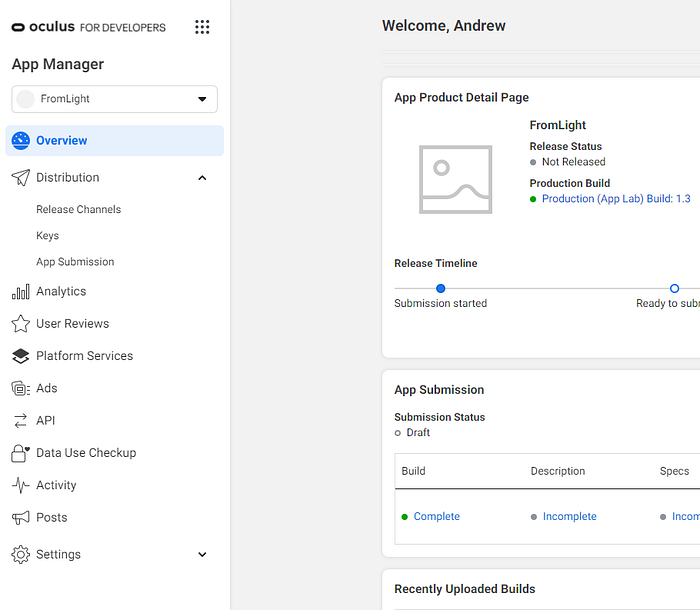
Below where it says API, click on that…
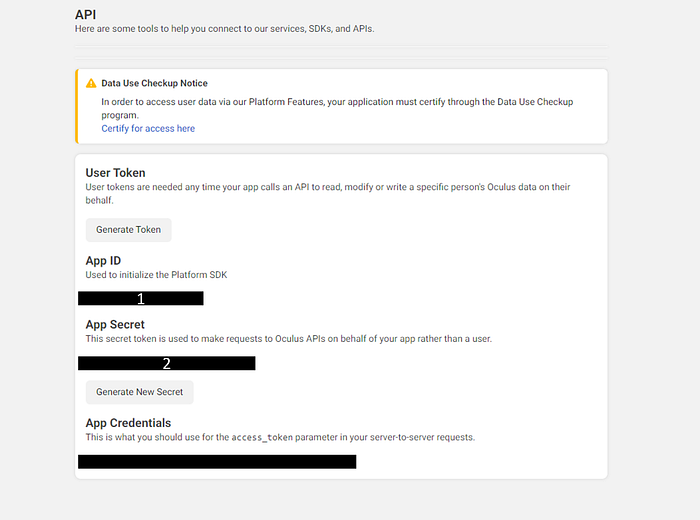
See the censored portions, one is marked 1 and the other is 2. That corresponds with the 1 and 2 on the CLI string above.
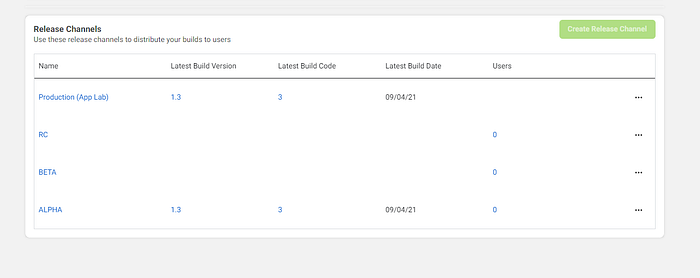
Once submitted, you should see your app in the ALPHA channel of your App’s released channels pane.
In order to get your App downloaded from the App Lab, go into your App, and hit the three dots next to Production(App Lab)
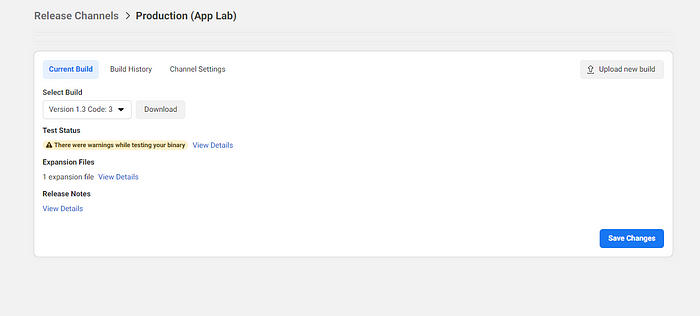
This will bring up the production pane, and under select build you will select the build you uploaded and hit save changes. Then, you can search for that in your Oculus Quest headset (search for the exact name of your app if it doesn’t show up automatically), download and play!
Oculus App Lab will also take care of updates and patching for you, so when you push a new build, your Oculus App will show Update in your headset.
To Recap:
This article has included sections for how to set up your project, package, upload, and finally download on to your Oculus Quest. It has been tested to work on my system and settings. I’ve included relevant links to the Epic or Oculus documentation where necessary, as well as some additional material for your perusal.
One thing I would appreciate for those of you reading this: If you find the settings above, particularly the render settings, can be adjusted for greater performance, let me know in the comments and I will test and edit the article. Unreal development on Oculus Quest needs more advocates, and thus we can build the community and push great development on the Oculus Quest.
Disclaimer:
I am not employed with Oculus, Facebook, or Epic Games in any way, shape or form. Much of the information within this article has been discovered specifically by trial and error, and readers should always apprise themselves of the most recent documentation by Epic Games and Oculus developers.
Happy Developing!
